Dry cleaning is a specialized cleaning process that uses what’s called a solvent to clean delicate fabrics and garments. Unlike traditional laundry methods, dry cleaning is ideal for garments that cannot be washed with water due to their delicate nature or construction.
How long it takes to dry clean a wedding dress can vary.
Typically, the process takes anywhere from a few days to a few weeks. It is important to note that the specific time frame will depend on various factors specific to the dress and the dry cleaner’s workload.
Inspection and evaluation of the dress to determine the cleaning requirements and any necessary repairs or alterations.
Pre-treatment of stains to ensure stain removal during the cleaning process.
The actual dry cleaning process. This is where the dress is gently cleaned using specialized solvents and equipment.
Post-cleaning finishing and inspection. This ensures the dress is properly cleaned and ready for use or storage.
To ensure a smooth wedding dress dry cleaning experience, it is recommended to:
Choose a reputable and experienced dry cleaner specializing in wedding dress cleaning.
Communicate any specific concerns or requirements regarding the dress to the dry cleaner.
Plan ahead and allow sufficient time for the dry cleaning process, especially if you have a specific deadline or event.
By understanding the dry cleaning process and considering these tips, you can ensure that your wedding dress receives the proper care and cleaning it deserves.
Key takeaway:
Dry cleaning a wedding dress can take varying amounts of time depending on factors such as the fabric used, level of stains or dirt, size and complexity, and the workload of the dry cleaner.
The type of fabric used in the wedding dress can influence the time required for dry cleaning.
The level of stains or dirt on the wedding dress can impact the duration of the dry cleaning process.
What is Dry Cleaning?
Dry cleaning is a method of cleaning clothes using chemical solvents instead of water. It is used for delicate or special garments that cannot withstand traditional washing methods. During the dry cleaning process, clothes are placed in a machine and exposed to a solvent that can dissolve stains, oils, and dirt. The solvent is drained and the clothes are dried using warm air. This method effectively removes stains and odors from various fabrics without causing damage.
Why choose to dry clean?
Dry cleaning offers several advantages. First, it allows for thorough cleaning of delicate fabrics such as silk, wool, and lace, without causing shrinkage or distortion. Second, it can remove tough stains that water-based methods may not be able to eliminate. Third, dry cleaning can help extend the lifespan of garments by reducing wear and tear caused by frequent washing.
If you have a special garment or tough stains that need to be removed, dry cleaning is a reliable option. Choose a reputable dry cleaner with experience in treating your specific garment type. Look for reviews or ask for recommendations from friends or family. Professional dry cleaning services can help maintain the quality and appearance of your clothes for longer.
How does Dry Cleaning work?
Dry cleaning is a specialized process that uses solvents to clean delicate garments. So, you might wonder, how does dry cleaning work? Well, the process begins with inspecting and evaluating the wedding dress to determine the best cleaning method. Stains and dirt are pretreated for optimal results.
In the dry cleaning machine, which is specifically designed for this purpose, the dress is gently agitated with solvent to remove dirt and stains. The solvent is then drained, and the dress goes through a thorough rinsing process to ensure that any remaining residue is completely removed.
Once the cleaning process is completed, the dress undergoes a careful inspection to ensure that it is impeccably clean and free from any stains. It is then professionally pressed and finished to restore its original shape and appearance, making it look as good as new.
The time it takes to dry clean a wedding dress can vary based on several factors, including the type of fabric, the level of stains or dirt, and the size and complexity of the dress. The workload and availability of the dry cleaner can also affect the turnaround time.
Fact: Dry cleaning is a popular choice for cleaning wedding dresses because it effectively cleans delicate fabrics without causing any damage or shrinkage. So, if you want to keep your wedding dress in pristine condition, dry cleaning is definitely the way to go.
How Long Does Dry Cleaning a Wedding Dress Take?
Dry cleaning a wedding dress typically takes one to two weeks, depending on various factors such as the type of cleaning required and the extent of stains or embellishments.
If your dress has significant stains or intricate embellishments, it may require more time for thorough cleaning.
The workload of the dry cleaner also affects the timeframe, especially if they have many dresses to clean.
In certain cases, the dry cleaner may offer rush or express services for an additional fee, which can expedite the process and deliver your dress sooner. It is essential to inquire about these services in advance to ensure their availability.
To ensure that your dress is ready on time, it is recommended to schedule the dry cleaning well in advance of your wedding or any other events. This allows for any unexpected delays or complications that may arise.
Communicate your specific timeline and requirements to the dry cleaner to ensure they can accommodate your needs.
Factors That Affect the Dry Cleaning Time
When it comes to getting your wedding dress dry cleaned, there are several factors that can influence how long the process takes. From the type of fabric used to the level of stains or dirt on the dress, every detail matters. The size and complexity of the dress, as well as the workload and availability of the dry cleaner, can play a role in determining the turnaround time. In this section, we’ll break down each of these factors to help you understand what affects the dry cleaning time for your precious gown.
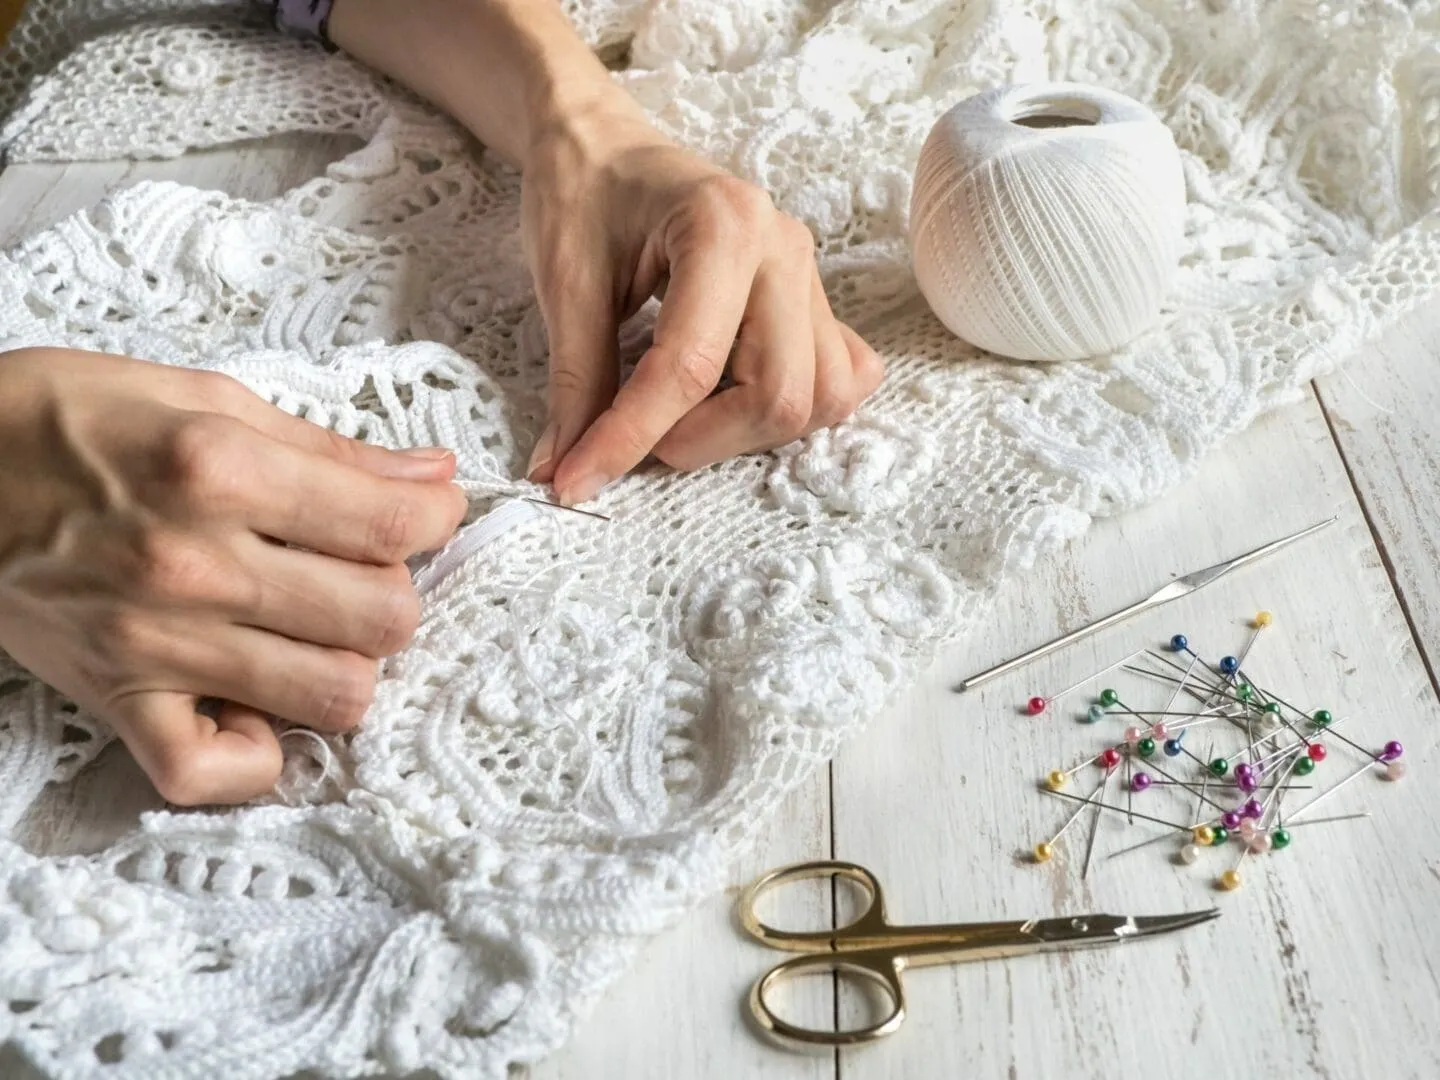
Type of Fabric Used in the Wedding Dress
The type of fabric used in the wedding dress plays a crucial role when it comes to dry cleaning. Different fabrics have different cleaning requirements in order to preserve them. Below is a table that outlines the common fabric types used in wedding dresses and their corresponding cleaning methods:
Fabric Type
Cleaning Requirements
Silk
Dry clean only
Lace
Dry clean or hand wash
Chiffon
Dry clean or hand wash
Satin
Dry clean or spot clean
Tulle
Dry clean or spot clean
Silk dresses should always be dry cleaned, whereas lace dresses can either be dry cleaned or hand washed with caution. Chiffon dresses can also be dry cleaned or hand washed, but one must exercise caution to prevent any damage. Satin dresses can be dry cleaned or spot cleaned to tackle minor stains. Tulle dresses, on the other hand, can be either dry cleaned or spot cleaned, depending on the severity of the stains or dirt.
To determine the most suitable cleaning method for your wedding dress, refer to the care instructions provided by the manufacturer or consult a professional dry cleaner. Taking into consideration the fabric type ensures effective and safe cleaning, thereby preserving the dress’s beauty for many years to come.
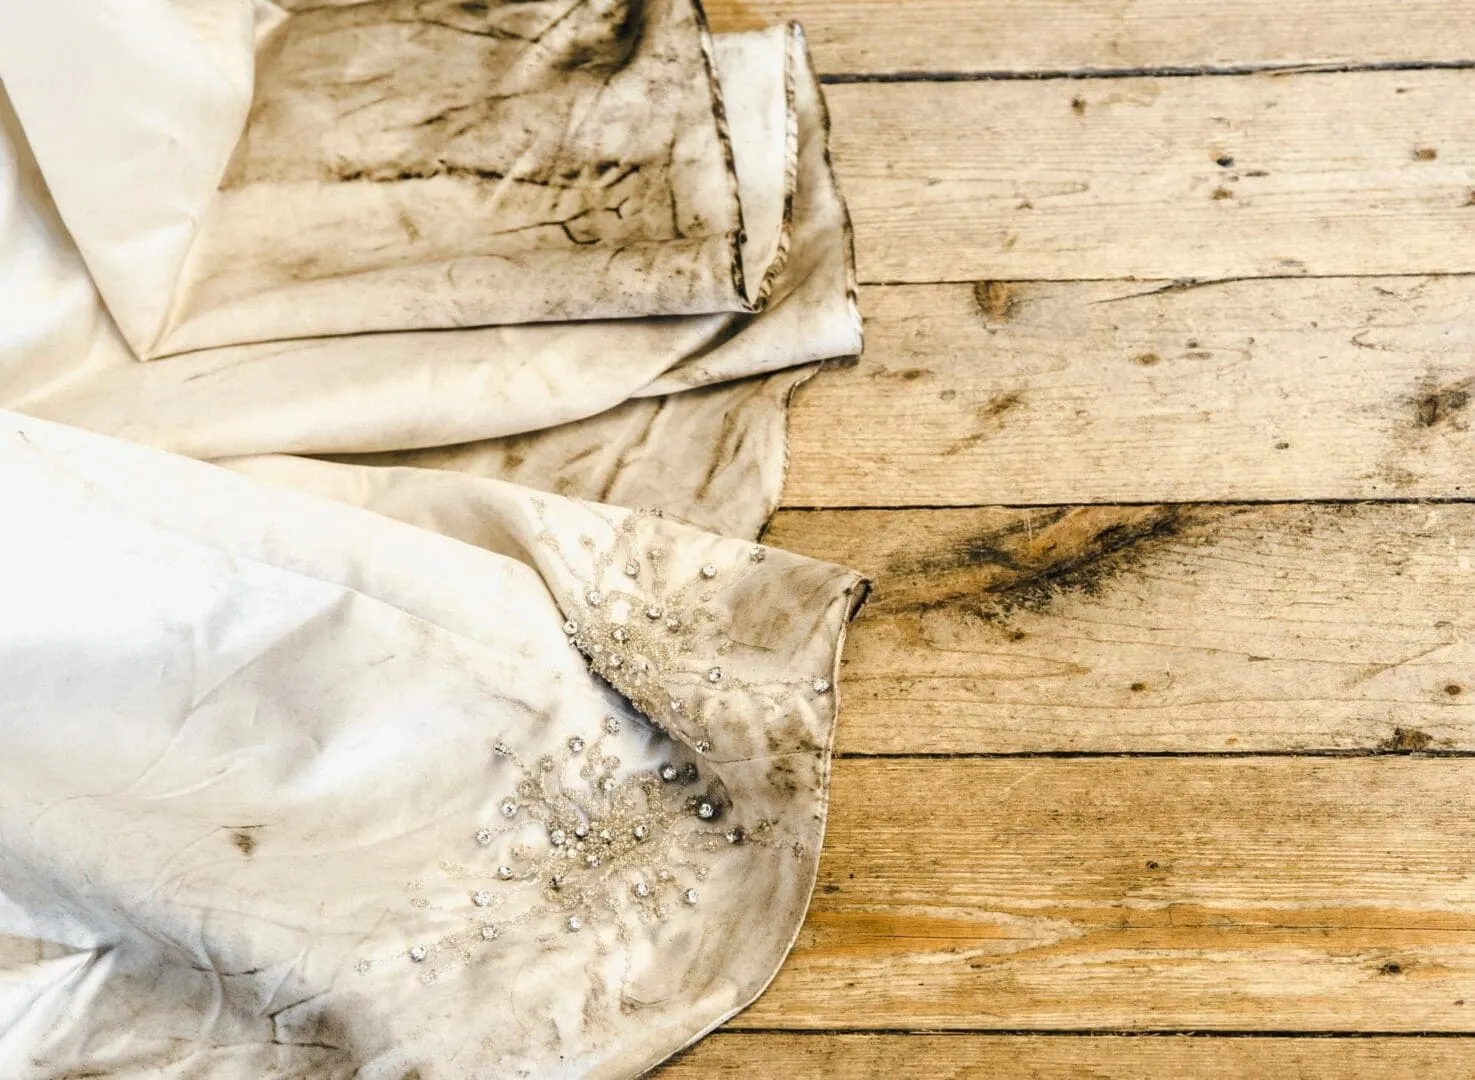
Level of Stains or Dirt on the Wedding Dress
According to the Dry Cleaning & Laundry Institute, When it comes to the level of stains or dirt on a wedding dress, there are several factors to consider.
The severity of stains: minor stains or dirt may make the dry cleaning process quicker.
The type of stains: certain types of stains, like oil-based or stubborn stains, may require more time and effort to remove, thus increasing the dry cleaning time.
The size and location of stains: the size and location of stains can affect the cleaning time. Larger or more widespread stains may require additional attention and time for thorough cleaning.
Fabric sensitivity: delicate fabrics or materials that require special handling can impact the cleaning time. Dry cleaners may need to use specific techniques for these types of fabrics.
Pre-treatment requirements: pre-treatment of stains may be necessary before the actual dry cleaning process. This pre-treatment can help loosen and remove stains, but it may also add to the overall cleaning time.
It’s important to remember that the exact duration of dry cleaning a wedding dress will vary depending on the specific circumstances. The level of stains or dirt on the dress is just one factor to consider. To get a more accurate estimate of the cleaning time, consult with a professional dry cleaner who can assess the dress and provide a timeframe based on its unique characteristics.
Size and Complexity of the Wedding Dress
The time required for dry cleaning a wedding dress depends on its size and complexity. If the dress is larger and more intricate, it will take longer to clean compared to a smaller and simpler one.
To give you an idea, here is a table displaying the average time needed for dry cleaning based on the size and complexity of the dress:
Size and Complexity
Average Time for Dry Cleaning
Small and Simple
2-3 days
Medium and Moderate
3-5 days
Large and Elaborate
5-7 days
Please note that these timeframes may vary depending on the specific dry cleaner and their workload. The availability of the dry cleaner can also affect the turnaround time.
Let me give you a real-life example. Samantha had a beautifully designed wedding dress with intricate lacework and beading. Because of the dress’s elaborate design, it took the dry cleaner 7 days to thoroughly clean and restore it. Understanding the impact of size and complexity helped Samantha plan accordingly and ensured that her dress received the necessary care and attention.
Workload and Availability of the Dry Cleaner
The time it takes to clean a wedding dress can be significantly impacted by the workload and availability of the dry cleaner. These factors should be considered when planning to have your dress cleaned.
The workload of the dry cleaner is determined by the number of dresses they have to clean. If the dry cleaner is overloaded with a high workload, it may take longer to clean your dress. On the other hand, if the workload is low, your dress may be cleaned more quickly.
The availability of the dry cleaner is also an important factor in the cleaning time. If the dry cleaner is busy or has limited hours, it may take longer to schedule and clean your dress. If the dry cleaner is easily accessible with flexible hours, your dress may be cleaned in less time.
It is important to note that the workload and availability of the dry cleaner can vary. Therefore, it is recommended to inquire about these factors when choosing a dry cleaner and estimating the cleaning time for your wedding dress.
What to Expect During the Wedding Dress Dry Cleaning Process?
Preparing your wedding dress for the big day requires careful attention and treatment. In this section, we’ll uncover what you can expect during the wedding dress dry cleaning process. From the meticulous inspection and evaluation to the pretreatment of stains, followed by the actual dry cleaning process and the finishing touches during post-cleaning, we’ll guide you through each step, ensuring that your cherished gown receives the utmost care and attention it deserves.
Inspection and Evaluation
During the inspection and evaluation stage of wedding dress dry cleaning, the dry cleaner typically takes the following steps. First, they visually assess the dress for any visible stains, spots, or damage. Next, they conduct a fabric test to determine the type of fabric used. If there are specific stains, the dry cleaner may perform spot testing to identify the best treatment. Throughout this process, the dry cleaner meticulously documents the condition of the dress, making note of any stains or tears.
Thoroughly inspecting and evaluating the wedding dress before cleaning is essential. This allows the dry cleaner to address any specific requirements or concerns, ensuring that the cleaning and treatment process is effective. As a result, the dress is beautifully restored.
Pretreatment of Stains
During the pretreatment of stains in wedding dress dry cleaning, professionals carefully examine the dress to identify different types of stains. Stains are then treated individually using specialized stain removers based on their nature. Before applying any stain removal product to the entire dress, a small inconspicuous area is tested to ensure it doesn’t damage the fabric.
For surface stains or dirt, professionals gently rub a cloth or sponge dampened with a mild cleaning solution onto the affected areas. Stubborn stains may require soaking the dress in a solution formulated for the specific stain type. Delicate brushes are used to gently scrub the stains and loosen any remaining particles. The dress is thoroughly rinsed to remove any residual cleaning agents or loosened stains.
Following these steps, the wedding dress is ready for the actual dry cleaning process. It will be immersed in a specialized solvent that effectively removes dirt and stains without damaging the delicate fabric.
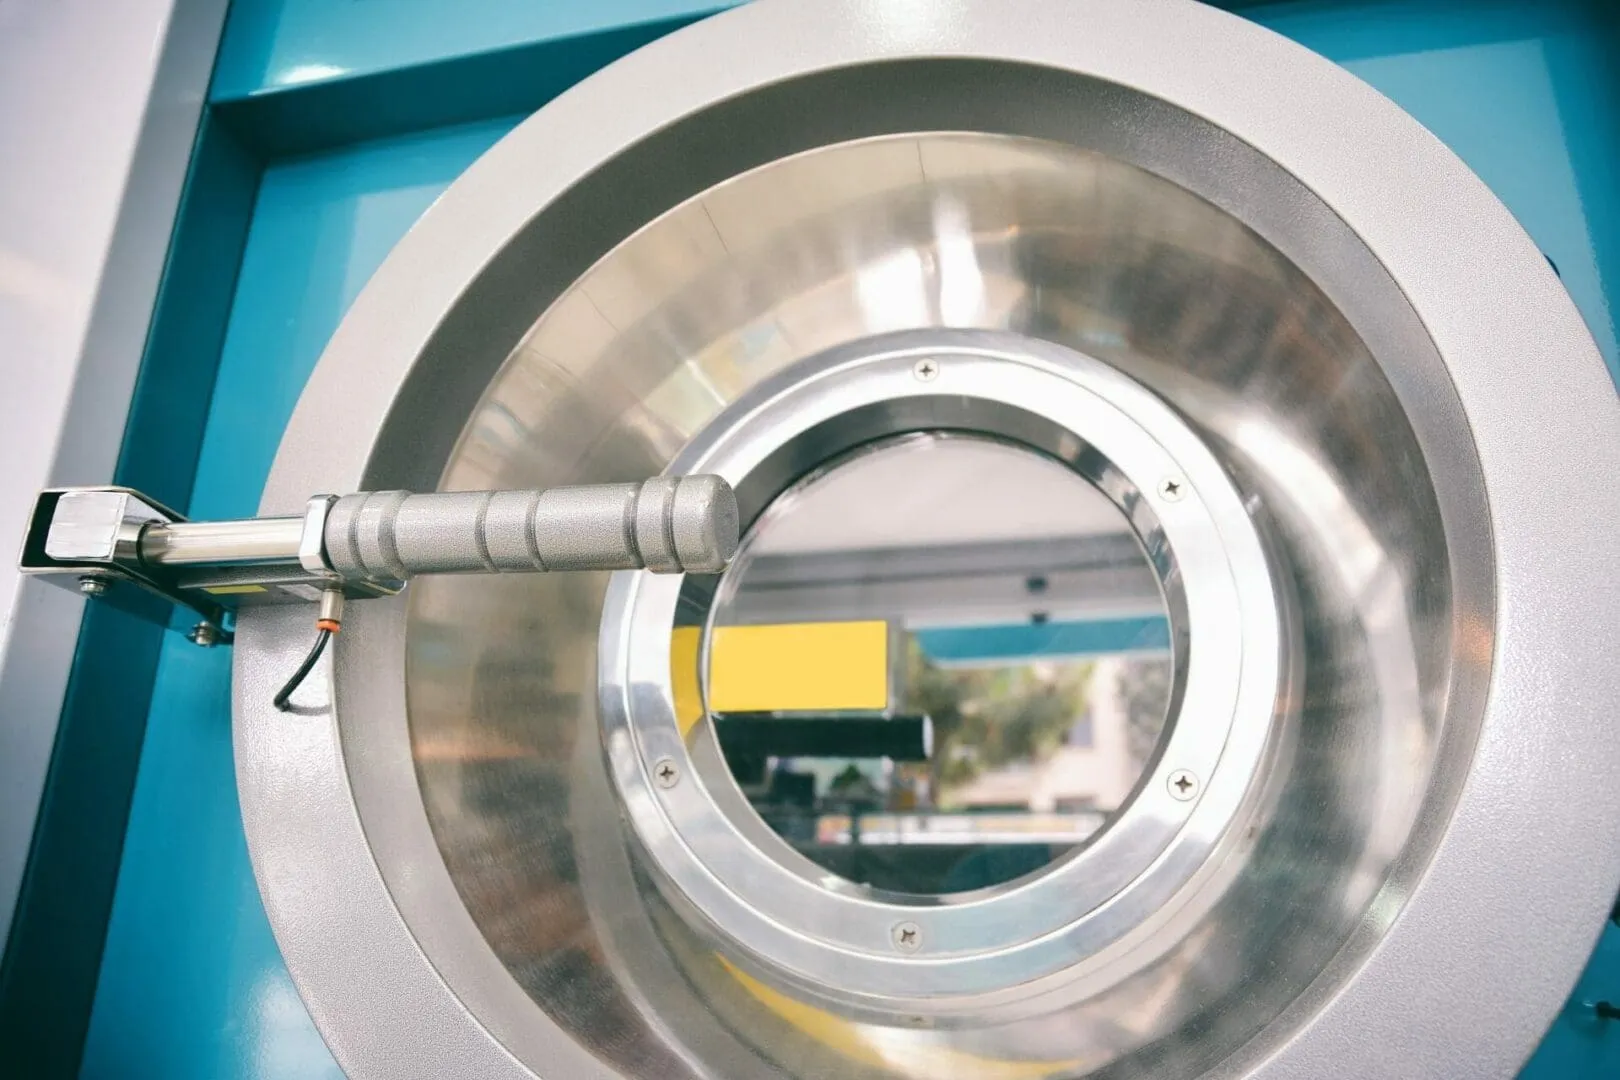
The Actual Dry Cleaning Process
The actual dry cleaning process encompasses a series of steps aimed at efficiently and effectively cleaning a wedding dress.
First and foremost, the dry cleaner meticulously examines and assesses the dress, carefully identifying specific areas of concern such as stubborn stains or delicate fabrics.
Subsequently, visible stains are treated beforehand, utilizing appropriate techniques and solutions that effectively loosen and eliminate them.
The dress is then delicately placed within a specialized dry cleaning machine, which employs a solvent derived from petroleum to effectively dissolve and eliminate dirt, oils, and stains.
Upon completion of the cleaning process, the dress undergoes a meticulous finishing and inspection phase, which may involve steaming or pressing to eliminate wrinkles.
Thorough scrutiny is conducted to ensure the dress attains the highest standards of cleanliness and quality.
It is crucial to note that the dry cleaning process for a wedding dress is a time-consuming affair, often spanning over several days, contingent upon the dress and the workload.
Nonetheless, the investment of time is undoubtedly worthwhile, as it ensures a comprehensive and meticulous cleaning.
To guarantee a seamless experience, it is paramount to select a reputable and seasoned dry cleaner.
Providing pertinent information regarding stains or the fabric itself can assist the dry cleaner in delivering effective treatment and cleaning.
Post Cleaning Finishing and Inspection
Post Cleaning Finishing and Inspection are crucial in wedding dress dry cleaning.
1. Pressing: Cleaned dress is pressed to remove wrinkles and restore shape.
2. Repairing: Loose threads, missing beads, or damaged areas are carefully repaired.
3. Spot Cleaning: Individual treatment and cleaning of remaining spots or stains.
4. Quality Check: Meticulous inspection to ensure high standards of cleaning and repairing.
5. Packaging: Careful folding or hanging on a padded hanger with protective material.
6. Labeling and Documentation: Proper labeling and documentation for tracking and returning.
A true story emphasizes the importance of post cleaning finishing and inspection. A bride received her wedding dress back from the dry cleaner without thorough quality checking. She discovered spots and loose threads later, causing stress and disappointment. This situation could have been avoided if the dry cleaner had properly inspected and finished the dress after cleaning. It reminds us to choose a reputable dry cleaner that pays attention to detail and provides a thorough post cleaning finishing and inspection process.
Tips for Ensuring a Smooth Wedding Dress Dry Cleaning Experience
Tips for Ensuring a Smooth Wedding Dress Dry Cleaning Experience:
Research: Before choosing a dry cleaner, it is essential to conduct thorough research to find reputable and reliable options. Take the time to read reviews, ask for recommendations from friends and family, and check for certifications or memberships that indicate expertise in wedding dress cleaning.
Preparation: Before taking your wedding dress for dry cleaning, carefully inspect it for any stains, tears, or damages. It is crucial to inform the dry cleaner about these issues so that they can provide appropriate advice and ensure the best outcome for your dress.
Specialized Cleaning: Look for a dry cleaner that specializes in wedding dress cleaning. Delicate fabrics and intricate details require a specialized touch to ensure they are properly cleaned and cared for.
Communication: Clear and open communication with the dry cleaner is key. Discuss your expectations, concerns, and specific instructions for the cleaning process. If you want beadwork preserved or stains removed, inform the dry cleaner so that they can tailor their approach accordingly.
Packing and Storage: When discussing your dress with the dry cleaner, also talk about the best way to pack and store it after cleaning. Some dry cleaners offer preservation services that protect against yellowing and other damages over time.
Now, for a true history: The tradition of white wedding dresses dates back to Queen Victoria’s wedding in 1840. Before that time, brides wore their best dress, regardless of color. Queen Victoria’s choice changed the trend, making white wedding dresses a symbol of purity and wealth. Despite the wide range of color and style options available to modern brides, white wedding dresses have remained popular.
How Long Does Dry Cleaning a Wedding Dress Take?
✅ The average duration for dry cleaning a wedding dress is a few days to a week.
✅ Dry cleaning a wedding dress before the wedding is recommended to be done one month ahead if off-season, or two months ahead if during the peak of the spring wedding season.
✅ Specialist cleaning and preservation services for wedding dresses can take anywhere from a few days to a couple of weeks.
✅ The duration of dry cleaning a wedding dress may vary depending on the method used and any additional services required, such as oil removal.
✅ If a wedding dress needs significant repairs or has extensive staining, the dry cleaning process may take longer.
From festive parties to family dinners, the holidays bring a packed calendar of gatherings. With lively cheer, heartfelt conversations, fun-filled games, and the arrival of wonderful guests, the joy of the season fills every corner of your home. However, once the last guest leaves, it’s time to turn your attention to freshening up your home—starting with your bedding items.
This article shares five simple and effective ways to keep your bedding guest ready for the next time—or just for your own post-holiday relaxation. Start the new year with a fresh and inviting space with these tips.
1 of 5 | Strip and Prepare All Bedding Layers for Cleaning
The first step in sanitizing and refreshing your bedding after holiday guests leave is to strip everything down to the bare mattress. This includes sheets, pillowcases, comforters, mattress protectors, and any extra blankets or throws your guests may have used. Preparing all bedding layers properly ensures a thorough clean and helps eliminate odors, allergens, and germs that can accumulate over the holiday season.
1. Start with the Top Layers
Begin by removing the comforter or duvet, followed by any decorative throws or extra blankets. These items often see the most use during guest stays, so it’s important to clean them first.
2. Remove Sheets and Pillowcases
Strip the bed completely, including fitted sheets, flat sheets, and pillowcases. These items come into direct contact with the skin and need to be cleaned thoroughly to remove sweat, oils, and bacteria.
3. Don’t Forget the Mattress Protector
If you use a mattress protector, remove it as well. This layer traps dust, spills, and allergens, making it a critical part of the cleaning process. Most mattress protectors can be machine washed, but check the care instructions to ensure proper handling.
4. Gather All Bedding in One Place
Collect all bedding items in one central location to make sorting easier. Separate items by fabric type or washing requirements to avoid damaging delicate pieces. For example:
Wash sheets, pillowcases, and mattress protectors together.
Wash comforters, duvets, and throws in a separate load if they require gentle cycles or low-spin settings.
2 of 5 | Don’t Forget to Pretreat Stains
After a busy holiday season filled with guests, your bedding might have picked up more than just memories—think coffee spills, makeup smudges, or even wine stains. Pretreating stains is an essential step to ensure they don’t set and become permanent. These simple steps can make a huge difference in restoring your bedding to its fresh, spotless condition:
1. Identify Stains Before Washing
Before tossing your bedding into the washer, carefully inspect every piece for visible stains. Common culprits include food, drinks, and body oils. Pretreating ensures the stains are addressed directly, preventing them from setting further during the wash cycle.
2. Choose the Right Stain Remover
Not all stains are the same, and neither are stain removers. Pick a product based on the type of stain and the fabric:
Protein-based Stains (sweat, blood): Use an enzymatic cleaner designed to break down organic matter.
Greasy Stains (lotions, food oils): Apply a small amount of dish soap or a grease-cutting stain remover.
Tannin Stains (coffee, wine): Use a stain remover with oxygen bleach, which is gentle on fabrics but effective on discoloration.
3. Apply the Stain Remover Properly
For the best results, follow these steps:
Apply the stain remover directly to the stain, ensuring it covers the area fully.
Gently rub together the fabric or use a soft-bristle brush to work the product into the fibers.
Let it sit for 5–10 minutes to penetrate the stain before washing.
4. Rinse Before Washing (If Necessary)
For particularly stubborn stains, rinse the treated area with cold water before adding the item to the washing machine. This helps to lift some of the residue and ensures the stain remover doesn’t over-saturate the fabric.
5. Don’t Skip This Step for Comforters
Comforters and duvets often have larger surface areas prone to accidental spills. Pretreating these spots ensures you don’t end up with faint discolorations that become harder to remove over time.
3 of 5 | Use the Right Washing Temperature
When it comes to cleaning your bedding after holiday guests leave, the washing temperature plays a big role in achieving the best results. The wrong temperature can damage delicate fabrics, fail to sanitize effectively, or even set stains permanently. Here’s how to choose the right temperature for each type of bedding and situation.
1. Understand the Fabric Type
Different fabrics have specific care needs, and the temperature you use should align with them:
Cotton Sheets: Can usually handle warm or hot water, which helps kill germs and remove dirt effectively.
Silk or Delicate Fabrics: Require cold water to prevent shrinkage, discoloration, or fabric damage.
Synthetic Blends: Perform best in cold or warm water to maintain their shape and integrity.
Down or Feather Comforters: Should be washed in cold or lukewarm water to protect the filling and prevent clumping.
2. Use Hot Water for Sanitizing
If sanitizing is your priority—especially after hosting guests—hot water can be effective for killing bacteria, dust mites, and allergens.
When to Use Hot Water:
For durable fabrics like cotton and polyester.
For heavily soiled items that need a deeper clean.
3. Choose Cold Water for Stain Protection
Cold water is ideal for preventing stains from setting, especially on delicate or brightly colored fabrics.
When to Use Cold Water:
For pretreated stains like blood, wine, or food.
For fabrics prone to shrinking or bleeding.
4. Balance Warm Water for General Cleaning
Warm water strikes the perfect balance between effective cleaning and gentle care. It’s a safe choice for most bedding that isn’t heavily soiled or particularly delicate.
When to Use Warm Water:
For blended fabrics that need a moderate temperature.
For light stains or general freshening after regular use.
5. Don’t Overlook the Rinse Cycle
No matter what temperature you use for washing, always choose cold water for the rinse cycle. This helps remove detergent residue and prevents shrinkage, ensuring your bedding feels soft and comfortable after washing.
4 of 5 | Choose a High Quality Detergent
When it comes to sanitizing and refreshing your bedding, the detergent you use can make or break the results. A high quality detergent not only cleans effectively but also preserves the integrity of your fabrics, removes tough stains, and leaves your bedding feeling soft and fresh. Here’s how to select the best detergent for your bedding:
1. Opt for a Detergent That’s Gentle but Effective
Bedding comes in contact with your skin, so it’s essential to use a detergent that’s tough on dirt but gentle enough to avoid skin irritation.
Look For: Hypoallergenic, fragrance-free, or plant-based detergents, especially if you or your guests have sensitive skin.
Avoid: Harsh chemicals, strong fragrances, or fabric softeners that can leave residue and weaken the fibers.
2. Consider Detergents Designed for Delicate Fabrics
For specialty items like silk sheets, down comforters, or weighted blankets, you need a detergent specifically formulated for delicate fabrics. These detergents are gentle on fibers and help maintain the quality and lifespan of your bedding.
Example: A detergent labeled “wool-safe” or “silk-safe” is ideal for delicate or natural materials.
3. Add Boosters for Stains or Odors
Sometimes, your bedding may need more than just detergent to tackle stubborn stains or odors.
Boosting Options:
Baking Soda: Neutralizes odors and helps whiten fabrics.
White Vinegar: Breaks down detergent residue and removes smells.
Oxygen Bleach: A safe alternative to chlorine bleach for brightening whites and removing stains.
4. Use the Right Amount of Detergent
Using too much detergent can leave a sticky residue on your bedding, while too little may not clean effectively.
How Much to Use:
Follow the recommended amount on the label for your load size and soil level.
For larger items like comforters, use just enough detergent to clean thoroughly without over-saturating the fabric.
5. Test for Sensitivities
If you’re trying a new detergent, test it on a small area of your bedding to ensure it doesn’t cause discoloration or damage. This is especially important for high-thread-count sheets or delicate fabrics.
5 of 5 | Vacuum and Deodorize the Mattress and Mattress Protector
Your mattress and mattress protector work hard during holiday gatherings, especially when hosting overnight guests. Even with clean sheets, these layers can collect dust, allergens, and odors that build up over time. Taking a few moments to vacuum and deodorize these often-overlooked bedding components can make a huge difference in maintaining a fresh and healthy sleep environment.
1. Start by Stripping Everything Off
Before you begin, remove all bedding layers, including the mattress protector. This gives you a clean slate to work with and allows you to target the mattress surface directly.
2. Vacuum the Mattress Thoroughly
Dust, skin cells, and allergens often accumulate on your mattress over time. Using your vacuum’s upholstery attachment ensures a deep clean.
How to Vacuum:
Run the attachment across the entire surface of the mattress, paying special attention to seams and edges where dust can hide.
Move slowly to allow the vacuum to lift debris effectively.
3. Deodorize with Baking Soda
Baking soda is a natural and effective deodorizer that absorbs lingering smells.
How to Apply:
Lightly sprinkle baking soda over the entire mattress surface.
Let it sit for at least 30 minutes—or longer if the odors are strong.
Vacuum off the baking soda completely.
4. Wash the Mattress Protector
While your mattress is airing out, don’t forget to clean the protector.
How to Wash:
Use a gentle cycle with warm water and a mild detergent.
Avoid fabric softeners, which can leave a residue and reduce the protector’s breathability.
Dry on low heat or air dry to maintain its fit and performance.
5. Let Everything Air Out
Once your mattress is vacuumed and your protector is clean, allow them both to air out for an hour or two before reassembling the bed. This helps ensure any residual moisture is gone and your sleep space feels completely refreshed.
Trust Sage Cleaners to Sanitize and Refresh Your Bedding Items— Schedule A Professional Cleaning Today!
Don’t stress about cleaning your bedding after guests leave—let Sage Cleaners take care of it for you! We specialize in high quality comforter cleaning right here in the Tampa area, catering to the needs of both residents and local businesses.
With our convenient free Pickup and Delivery Service, you don’t even have to leave your home. Simply call us to book a cleaning appointment—or better yet, create an account with us so you can schedule your cleanings any time, at your own convenience. And here’s the best part: Get 30% off your first order!
As you’re excited to unpack your stored bedding for the new season, you might notice a faint musty odor reminding you it’s been tucked away for a while. Or perhaps there’s a crease or two that just won’t smooth out. Though these might frustrate you at first, they can easily be resolved with the right knowhow, and this article is here to guide you through it. We hope you find it helpful!
Why Your Bedding Needs Refreshing After Storage
Bedding that’s been in storage often picks up smells, dust, or even signs of moisture that can leave it feeling anything but fresh. While it’s tempting to toss it straight onto the bed, taking the time to refresh your bedding ensures it’s clean, comfortable, and free from anything that could irritate your skin or disrupt your sleep.
Among the reasons why refreshing your bedding is a must:
It May Smell Musty: Storage spaces, especially those with limited airflow, can leave bedding smelling stale or damp. A good refresh eliminates these odors, restoring your bedding’s clean and cozy scent.
Dust and Allergens Build Up Over Time: Even in sealed bags, dust and allergens (like house dust mites) can find their way onto your bedding. Washing or airing out your items ensures a healthier, allergen-free sleep environment.
It Could Harbor Moisture or Mildew: If your bedding was stored in a humid area, there’s a chance moisture seeped in, leading to mildew or mold. A proper cleaning removes these harmful elements and prevents unpleasant surprises.
Wrinkles and Creases Impact Comfort: Folded bedding often comes out of storage with deep creases or wrinkles, which can feel rough and uncomfortable. Smoothing them out ensures your bedding looks and feels its best.
Stale Fabrics Feel Uninviting: Textiles like cotton, linen, or microfiber can lose their softness after being stored for long periods. Refreshing restores their plushness, making them feel inviting and luxurious again.
Lingering Odors Can Transfer to Your Mattress or Pillows: Bedding that hasn’t been refreshed can pass odors or moisture to your mattress or pillows, making the issue harder to fix. Starting with clean, refreshed bedding avoids this problem entirely.
Best Ways to Remove Odors From Stored Bedding
Bedding can take on smells that aren’t exactly inviting, especially when stored in confined spaces. Whether it’s a musty scent from lack of airflow or an odd smell from storage materials, it’s frustrating to deal with bedding that doesn’t feel fresh.
Luckily, there are plenty of easy and effective ways to banish those odors and restore your bedding to its fresh, clean state, starting with the following:
Air It Out Outdoors
The simplest and most effective method is to let your bedding breathe. Hang it outside on a sunny, breezy day—fresh air and natural sunlight work wonders to eliminate odors while killing off any bacteria or dust mites.
Sprinkle Baking Soda
Baking soda is a natural deodorizer that’s perfect for stored bedding. Sprinkle it generously over the surface of your comforter or sheets, let it sit for a few hours, then shake it off or vacuum it up before washing.
Use White Vinegar in the Wash
Adding a cup of white vinegar to your washing machine’s rinse cycle can neutralize tough odors. Don’t worry about the vinegar smell—it fades away once your bedding is dry, leaving it fresh and clean.
Steam Clean for a Quick Refresh
If washing isn’t an option, try using a garment steamer to remove odors. The steam penetrates the fabric, loosens trapped smells, and can also help smooth out wrinkles while you’re at it.
Dry with Essential Oils
Add a few drops of your favorite essential oil to a dryer sheet or wool dryer ball and toss it into the dryer along with your bedding. Scents like lavender, eucalyptus, or citrus will leave a gentle, refreshing aroma.
Try Activated Charcoal Bags
For long-term storage, keep activated charcoal sachets in your storage containers. These absorb moisture and odors while keeping your bedding fresh, so it’s ready to use when you unpack it.
Refresh with Fabric Spray
For a quick fix, lightly mist your bedding with a fabric freshener spray. Look for one that’s non-toxic and safe for delicate fabrics, and avoid oversaturating the material.
Check Bedding for Mold and Mildew
The unmistakable smell of mold or mildew on stored bedding is impossible to miss—it’s damp, earthy, and far from pleasant. Mold and mildew can develop when bedding has been stored in humid or poorly ventilated areas, leaving not only a bad odor but also potential health risks. Before putting your bedding back into use, it’s crucial to check for these issues and address them properly to ensure it’s clean and safe.
Here are the best techniques to check and remove mold and mildew from your bedding:
Inspect Closely for Spots or Discoloration
Lay your bedding flat in a well-lit area and look for small black, green, or gray spots, which are telltale signs of mold or mildew. Check folds and creases where moisture is most likely to settle.
Do a Quick Sniff Test
Mold has a distinct musty smell. If your bedding smells off—even if you can’t see visible signs of mold—there’s a chance mildew might have started forming. This is especially common in humid storage conditions.
Pretreat Stains with White Vinegar or Hydrogen Peroxide
For visible mold or mildew spots, dab the affected area with white vinegar or hydrogen peroxide before washing. These natural cleaners kill spores and help lift stains without damaging delicate fabrics.
Wash Thoroughly with Hot Water (If Fabric Allows)
Mold spores are tough, so a hot water cycle is often the best way to remove them. Check the care label first—if your bedding can’t handle the heat, opt for warm water with a mold-fighting detergent.
Add Baking Soda to the Wash
Baking soda not only neutralizes odors but also helps scrub away mildew stains. Add half a cup to your detergent for an extra cleaning boost.
Air Dry in Direct Sunlight
After washing, hang your bedding outside in the sun. Sunlight has natural antibacterial properties that help eliminate any remaining spores and prevent mold from coming back. Plus, it gives your bedding a fresh, clean scent.
Use a Fabric-safe Mold Cleaner for Stubborn Cases
If the mold persists, invest in a cleaner specifically designed for textiles. Carefully follow the product’s instructions to avoid damaging the fabric.
When to Wash and When to Dry Clean
Although bedding items like sheets, pillowcases, and comforters are designed for regular use, not all of them should be treated the same when it comes to cleaning. Some can be safely loaded into your washing machine, while others need the expertise of a dry cleaner.
As such, knowing when to wash versus when to dry clean helps you keep your bedding fresh and in great shape without accidentally damaging it.
Washing
Wash When It’s Everyday Bedding: Sheets, pillowcases, and lightweight cotton or microfiber comforters are typically machine-washable. These items can handle regular laundering at home and should be washed every 1–2 weeks to keep things fresh and hygienic.
Wash When It’s a Stain You Can Spot Treat: If your bedding has small, manageable stains like spills or makeup marks, you can pretreat and wash it at home. Use a gentle detergent and a cold or warm cycle to avoid shrinkage or fading.
Wash When It’s Linen or Cotton Bedding: Natural fibers like linen and cotton are durable and can usually handle machine washing. Use a gentle cycle with cold or warm water, and skip the fabric softener to maintain their softness.
Wash When It’s Time for Regular Maintenance: Even if your bedding looks clean, regular washing removes sweat, dust mites, and allergens. This is especially important for pillowcases and sheets that come into direct contact with your skin.
Dry Cleaning
Dry Clean When It’s Labeled “Dry Clean Only”: Always follow the care label! If your comforter, duvet, or throw blanket specifies “dry clean only,” it’s safest to trust the pros. Dry cleaning protects delicate fibers, such as silk or satin, and ensures fillings like down feathers aren’t damaged by water.
Dry Clean When It’s Too Bulky for Your Machine: Oversized items like king size comforters, heavy quilts, or duvets with thick insulation can be too bulky and heavy for a standard washing machine. Dry cleaning ensures these pieces are thoroughly cleaned without overloading your washer or dryer.
Dry Clean When It’s Vintage or Antique Bedding: Older, fragile textiles can be easily damaged by water or harsh detergents. A professional dry cleaner knows how to handle these items to carefully preserve their beauty and structure.
Dry Clean When You Deal with Odors or Heavy Stains: For tough odors, oil stains, or deep-set grime regular washing can’t tackle, dry cleaning is the best way to get a deep clean without harming your bedding.
Need Help Restoring Your Bedding’s Freshness? Call Sage Cleaners for Expert Bedding Care and Impeccable Results!
Unpacking your bedding and realizing it doesn’t feel or smell fresh can be frustrating. Whether it’s sheets that have absorbed closet odors, blankets that have trapped allergens, or linens that might harbor hidden bacteria, your bedding deserves professional attention!
At Sage Cleaners, we’re proud to be the highest-rated dry cleaning and laundry company in the Tampa Bay area, known for delivering top-quality care for your bedding and clothing items. Our expert cleaning services effectively remove odors, allergens, and bacteria while restoring the softness and freshness of each piece.
Call us at 813-742-8345 to schedule your FREE pickup today and get 30% OFF your first order!